Nov 25, 2011

Creating and Using Photoshop's Clipping Masks

Introduction

Often, when creating images in Photoshop, you'll want one layer to take on the shape of another. For instance, in the example below, a photo has taken on the shape of a rounded rectangle:
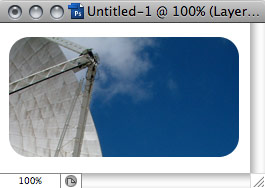
A photo clipped to a shape
To achieve this affect, you could draw the shape, and use that shape's transparency to delete the pixels of the photo. That would have the desired result, in that the photo would take on the particular shape, but what if you wanted to change the shape? Or recompose how the photo occupied the space? You'd have to repeat the entire process.
The ideal way of doing this is to not do any destructive edits at all, and we can achieve this easily by using a Clipping Mask. At its most basic, a Clipping Mask consists of two layers:
  1. A base layer, which provides the shape (in this case, the rounded rectangle)
  2. A second "clipped" layer, which provides the "content" (the photo)
This technique is so useful, and I use it everyday to create website graphics. It's really something that's easy to master and that will transform your approach to creating images within Photoshop!

Creating a Clipping Mask

To create a Clipping Mask, first make sure the base layer is directly under the layer that you want to be clipped in the Layers palette. Hold down Alt/Option and click the line between the two layers in the Layers palette. The cursor changes to a left pointing arrow and tow interconnecting circles, like a little Venn diagram. Click the mouse.
Immediately, you'll see the photo layer "clip" to the base layer. To denote this, you'll see a right-angled downward pointing arrow next to the clipped layer, as below.
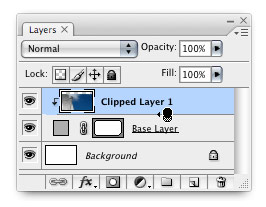
Clipping mask in the Layers palette
You can add multiple layers to the Clipping Mask by repeating the procedure. Simply Alt/Option + Click on the line between other layers you want to add to the mask. You can also Shift-select multiple layers and add them all to the Clipping Mask at once by Alt/Option clicking the line between the bottom of the selected layers and the base layer. The screenshot below shows two layers within the clipping mask.
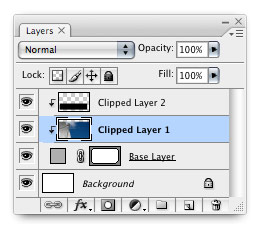
Multi-layer clipping mask
To "release" the mask, simple Alt/Option + Click again on the dividing line between layers

The benefits of using a Clipping mask

There are two main benefits to using a Clipping Mask rather than a destructive edit. The first is that you can recompose the layers within the Clipping Mask, which still have all their image data, even outside the visible area defined by the mask. That means that you can select the clipped layer you want to recompose and using the Move tool, drag the image around within the mask until you have it right. That's a massive time-saver over the destructive approach, and will make you more willing to experiment since it's so easy.
Secondly, you can reshape the base layer on the fly, and see the changes reflected in the Clipping Mask. For instance, you could use the shape editing tools to edit a shape layer while it was still forming the mask, getting instant visual feedback on the results.

What kinds of layers can I use as the base layer for a Clipping mask?

Pretty much any type of layer can be used as a the base layer for a Clipping mask, including Type layers, vector shape layers and normal bitmap layers. Lets have a look at some examples of these in action. First, a Type layer:
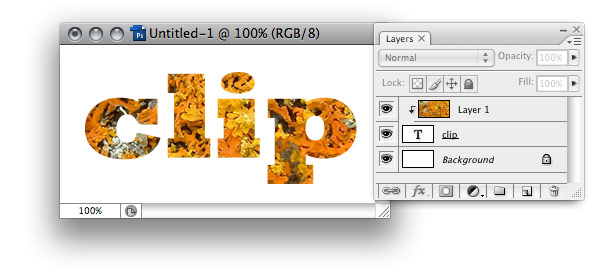
Type as base layer
Here, the Type layer is the base layer, allowing the photo to show through only where the there's a letterform. The great news is that the Type layer remains editable with the Type tool even when forming the mask, so you can re-edit the type and try out different font styles to your heart's content!
We've seen a vector shape layer in action already, but the example below shows a detailed Custom shape layer forming the base layer of the Clipping Mask:
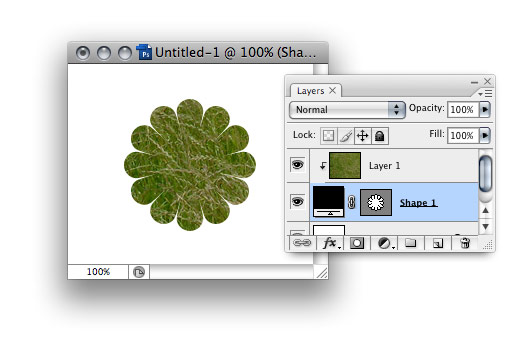
Vector shape as base layer
It's also possible to use the transparency of any bitmap layer to create a Clipping Mask. Below, I've used a layer containing a large, soft brush stroke as the base layer for the Clipping Mask.
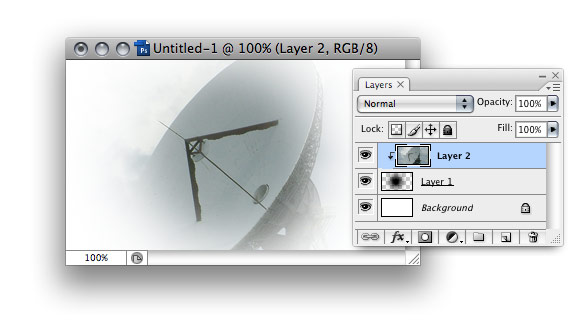
Brush stroke as base layer

Opacity & Blending Modes

You can adjust the opacity of the base layer of the Clipping Mask to change the opacity of all the layers above it. In other words, the clipped layers don't just take on the shape of the base layer, but also the opacity settings. This also applies to the Blending Mode of the base layer. For instance, if you apply a Blending Mode of Soft Light to the baselayer, it will affect all the clipped layers too.
It gets better. You can also adjust the opacity and Blending Modes of all the clipped layers individually, which is a great way of creating lush, detailed images. In the example below, the base layer is a pink heart shape. The moss layer provides texture, and is set to a low 28% opacity. The machinery (the centre of the earlier satellite dish) is set to Hard Light Blending Mode, allowing it to take on the texture of the moss below.
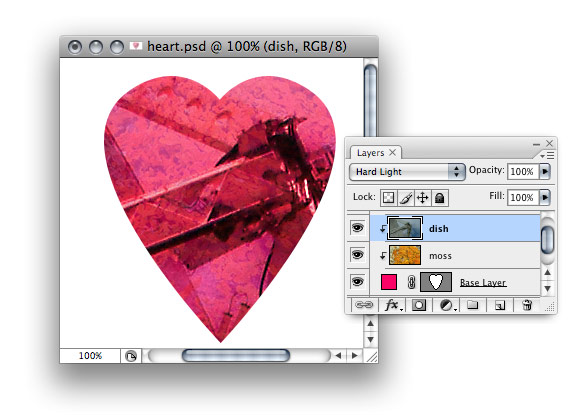
Opacity and Blend modes

Layer Styles

A fun trick is to apply Layer Styles to the base layer of the Clipping Mask, which allows you to add all sorts of effects to the basic Clipping Mask. To achieve this, double-click on the base layer of the Clipping Mask to bring up the Layer Styles dialogue box, and add effects as you see fit! You can see some examples below.
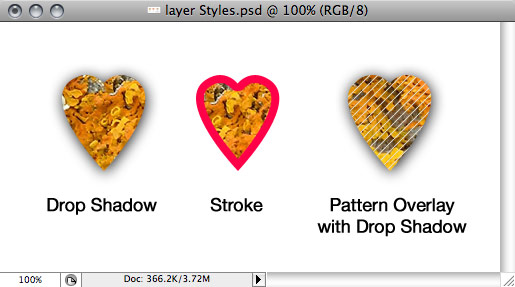
Layer Styles and Clipping Masks
Note, you can also add Layer Styles to the clipped layers as well, and the base layer will clip these along with the layer contents.

In practice

Finally, if you want to see how I use Clipping masks on a day-today basis, take a look at this imaginary website design below. It uses Clipping Masks for the menu background, the header graphic, and for the promo area on the right. I've also added an Inner Shadow Layer Style to the base layers.
Download the PSD file here (2.8Mb) to see how it all works.
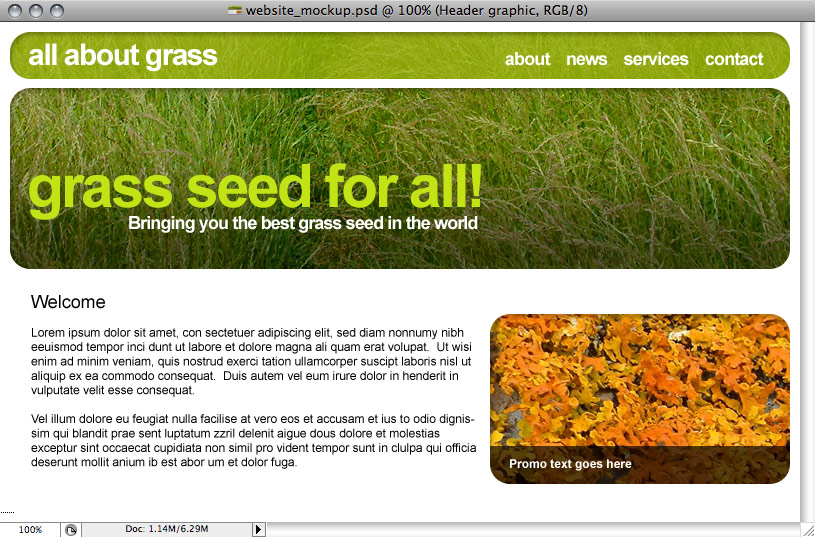
Clipping Masks in practice

Finising Up

As you can see from the example above, I seriously couldn't be without Clipping Masks. They make it very easy to achieve some great effects which I can then tinker with at length without any fear that I'm making destructive edits, and they're great when a client decides that they need a different crop of an image at a moment's notice!
As always, experiment and have fun!

Suu Tam

Nov 22, 2011

Photo Effects Week: Create a Fantasy Miniature World in Photoshop

The following assets were used during the production of this tutorial. We have granted a complimentary personal license for some of the assets to Psd Premium Members for the stock photos used in this tutorial. The images can only be used for the purpose of this tutorial and they can be accessed in the source files of your premium download. If you are not a premium member, you can download the images used in this tutorial below.


Step 1

Create a new Photoshop document with 3000×1900 pixel resolution. With the Rectangle Shape Tool (U) draw a shape like this.


Step 2

Create a new shape below the first one with the Pen Tool (P). Then duplicate the shape and reflect it horizontally.


Step 3

Place the Grass texture inside the document with File > Places command (this will place the grass as a Smart Object). Set the grass layer as a Clipping Mask by clicking on the separation line between the shape layer and the grass texture while holding the Alt key. Decrease the texture dimension with Cmd/Ctrl + T. If needed duplicate the grass layer to fill the shape entirely. Finally add an Unsharp Mask (Filter > Sharpen > Unsharp Mask) filter to the grass using a small Radius and an high Amount.


Step 4

Add a Hue/Saturation Layer Adjustment to boost the green colors with the saturation slider. Create a group for the top parts and apply a Layer Mask by loading the selection from the shape top layer, simply click on the layer’s thumbnails in the Layer Palette. With a small brush paint black inside to hide the upper straight lines, this will create a nice grass effect.


Step 5

Repeat the steps 3-4 for the lower shapes, this time use the Soil Texture and hide the lower parts. You have to separate the left part from the right part. Tip: organize your layers in group is the best option.


Step 6

In a separate blank layer, select a light brown color and paint with a small hard brush inside the soil texture to create some roots. Set the layer blending mode to Color Dodge. I also created a divider between the two sides.


Step 7

With a soft brush I painted lights and shadows using respectively white and black color. I created a new layer for each part.


Step 8

Create a new layer and fill it with white. Now in the menu, 3D > New Shape for Layer > Sphere to create a 3D shape, alter the sphere dimension to fit the base layer and finally rasterize it. Double-click on the layer in Layers Palette and set the Blending If propriety as below. Duplicate the sphere layer and set the blending mode of the copied one to Color Burn with 70% opacity.

Step 9

Create a black ellipse shape a apply a Gaussian Blur filter. Set the blending mode to Soft Light and the opacity to 80%. Put this layer above the sphere layers. I created another layer to add a white light spot on the top part of the sphere.


Step 10

Add a Hue/Saturation Layer Adjustment to simulate the water color, decrease the opacity to 60%, use a Layer Mask to apply this only to the sphere. Then create a black circular shape as below and set the blending mode to Overlay.


Step 11

Do add more depth to the water add a new layer and fill it with gray. Next go to Filter > Render > Clouds. Apply a Layer Mask to this layer and set the blending mode to Soft Light with 80% opacity. Try to decrease the layer dimension to achieve a different result, but remember to unlink the Layer Mask before.


Step 12

In a new layer paint some black in the bottom part of the sphere, set the Blending Mode to Soft Light an Opacity to 60%. As you can see, It’s time to hide the top part of the sphere with a Layer Mask in the Sphere layers.


Step 13

The next step is to create the sphere shadow. Simply use the Ellipse Tool (U) to draw a circular black shape and select a 60% opacity value, then blur the shape. Also notice that I add a little white spot inside the sphere, just paint some white color inside a new layer.


Step 14

Place the Jellyfish image inside the document, and open up the .psb associated file by clicking in the layer’s thumbnail in the Layer Palette. You can do this only if you place the image as a Smart Object Layer. Next press Cmd/Ctrl + I to invert the image and Cmd/Ctrl + Shift + U to desaturate. Save and close the .psd file. Set the jellyfish layer to Darken. Finally duplicate it and set the blending mode to Color Burn at 20% opacity.


Step 15

With the Stamp Tool (S) clone in a new layer part of the grass to hide the lower part of the sphere.


Step 16

Draw a circle with the Ellipse Tool (U) using a gray color. Apply this Layer Style and set the blending mode to Overlay at 20% opacity. Rasterize the layer and press Cmd/Ctrl + I to invert it.


Step 17

In the next step we’ll add some decoration to the base layer. Insert the garden image, and select part of the purple flowers, apply a Layer Mask to show only that part. Refine the mask border by painting with a small brush. Next add an Unsharp Mask filter to the flowers with a low radius and an high Amount.


Step 18

Repeat the step 17, place the flowers in different place, and if you want, change the flowers color with a Hue/Saturation Layer Adjustment applied as a Clipping Mask.


Step 19

You have to do the same process for mushrooms and pebbles. Use the image below as a reference.


Step 20

Basically the same things have to be repeated with the ship. But you’ll need to alter it’s shape with Cmd/Ctrl + T.

Step 21

I added a shadow to the ship and placed the little bottle. I added a light blue background too.


Step 22

Open the Air-balloon image, and make a selection of a balloon with the Quick Selection Tool (W), the with the Move Tool (V) Drag&Drop the balloon inside the project document and convert the layer into a Smart Object. Add a Hue/Saturation Layer Adjustment as a Clipping mask to boost the color and an Unsharp Mask Filter to boost details.


Step 23

Select another balloon from the image and repeat the step 22. Try to respect the light source orientation of the balloon. Moreover the second balloon will cast a shadow on the drop. So you have to draw it, into a new layer.


Step 24

It’s time to make the clouds. There are many methods to do it. The easiest one is to create a new blank layer and paint with a black soft brush with an opacity of 20%. You can use the Dodge and Burn Tool to refine the clouds lighting and the Smudge Tool to refine the shapes.


Step 25

Open the birds image and select the birds with the Quick Selection Tool. Put them in random order above the drop.

Step 26

Place the plane image inside the document and repeat the Step 3.


Step 27

With the Pen Tool (P) draw a shape like below and add the following Layer Style.


Step 28

In a new layer paint with a small brush the little cords between the plane and the banner.


Step 29

I added a text to the banner.


Step 30

And finally I added a shadow to the base layer.


Final Image ^^


Sưu Tầm